
WDT Tool: The $10 Fix for Clumpy Espresso Grounds
Quick Answer
A wdt tool is a handle holding thin stainless needles that you stir through dry coffee grounds in the portafilter basket before tamping, breaking up clumps so water flows evenly. On Amazon, checked November 5, 2026, a basic model costs $9.99 with 618 reviews, a 0.35 mm seven-needle version costs $19.99, and the retractable Subminimal Flick costs $29. It is the cheapest accessory that meaningfully reduces espresso channeling, though no controlled published study has yet measured its effect on extraction yield .
Key Takeaways
- WDT stands for Weiss Distribution Technique, described by John Weiss on the Home-Barista forum in December 2005 as a fix for clumpy grounds from home grinders.
- $9.99 buys the entry-level wdt tool on Amazon (618 reviews, 2,000+ sold monthly, price checked November 5, 2026). That is less than two café lattes.
- Needle diameter matters more than needle count. 0.35 mm needles pass through the bed with less drag than 0.4 mm; Normcore's V3 now offers 0.25 mm and 0.30 mm options.
- A wdt tool and a leveling tamper do different jobs. Needles redistribute grounds throughout the depth of the puck; a wedge distributor mostly smooths the top few millimetres .
- The $29 Subminimal Flick retracts its needles behind a cap, which matters on a shared counter or a kitchen with kids (902 reviews, November 5, 2026).
- A DIY version costs nothing: three straightened paperclips or acupuncture needles pushed into a wine cork does the same mechanical work, just with worse ergonomics.
- Skip it if you run a super-automatic or capsule machine. There is no accessible puck to stir.
What is a wdt tool and how does it work?
A wdt tool is a small handle fitted with several fine stainless steel needles, usually between 0.25 mm and 0.4 mm thick, that you rotate through the dry coffee in your portafilter basket to break up clumps and even out density before tamping. The acronym comes from the Weiss Distribution Technique, named for John Weiss, who posted the method on the Home-Barista forum in December 2005 after getting tired of the clumpy output from home grinders.
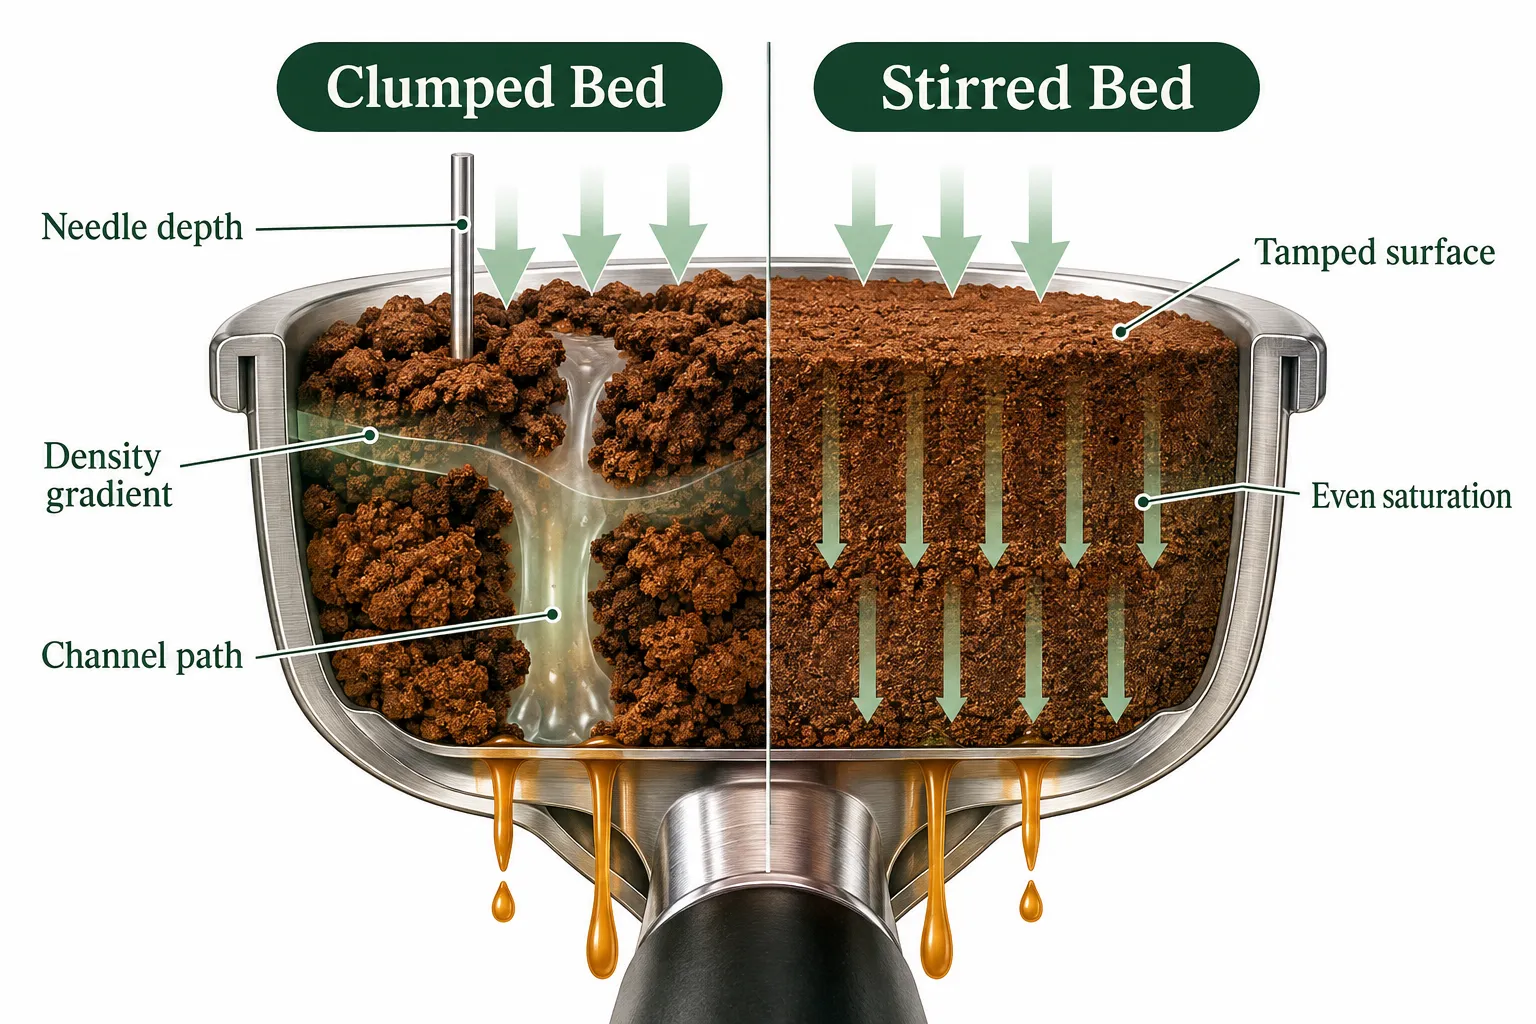
The mechanism is simple physics. Ground coffee carries a static charge and tends to fall out of a grinder in lumps and ropes, not an even dusting. Those lumps create a puck with uneven density. Water under nine bars of pressure takes the path of least resistance, so it rushes through the loose regions and barely touches the dense ones. That is espresso channeling, and it tastes like sour and bitter in the same sip.
Stirring with thin needles rearranges particles vertically and horizontally. Barista Hustle credits Scott Rao with bringing the technique into modern specialty practice and notes that deeper stirring can raise puck resistance and reduce shot-to-shot variation.
Clumpy coffee grounds are not a grind size problem. They are a distribution problem, and a $10 wdt tool addresses it directly.
Does a wdt tool actually improve espresso shots?
For most home setups with a bottomless portafilter, yes, visibly. The honest caveat is that the strongest evidence is mechanical reasoning and observed behaviour, not a peer-reviewed trial. The Espresso Report states plainly that there is still no controlled published study measuring the effect of a wdt tool on extraction yield .
What home baristas can actually observe:
- Fewer sprayers. With a naked portafilter, channeling shows as a jet of coffee spraying sideways. Stirring the bed usually stops it.
- Longer, steadier shot times at the same grind setting. Even density means more resistance, which is why some people need to grind slightly coarser after adopting WDT.
- Less variation between shots. Two shots pulled the same way land closer together.
Taste is harder to pin down. A more even extraction tends to read as sweeter and more balanced, because you stop pulling bitter compounds from over-extracted channels while leaving the rest under-extracted. That is the mechanism, not a measured promise. If you want the deeper background on why extraction behaves this way, our guide to espresso extraction and crema covers the chemistry.
Decision rule: if your shots already taste balanced and your naked portafilter pours a clean, even cone, a wdt tool will change little. If you see spraying or your times jump around by five seconds, buy one.
How do I use a wdt tool correctly?
Grind into the basket, insert the needles to near the bottom, stir in small circles while slowly working outward, then level and tamp. The whole thing should take under fifteen seconds.
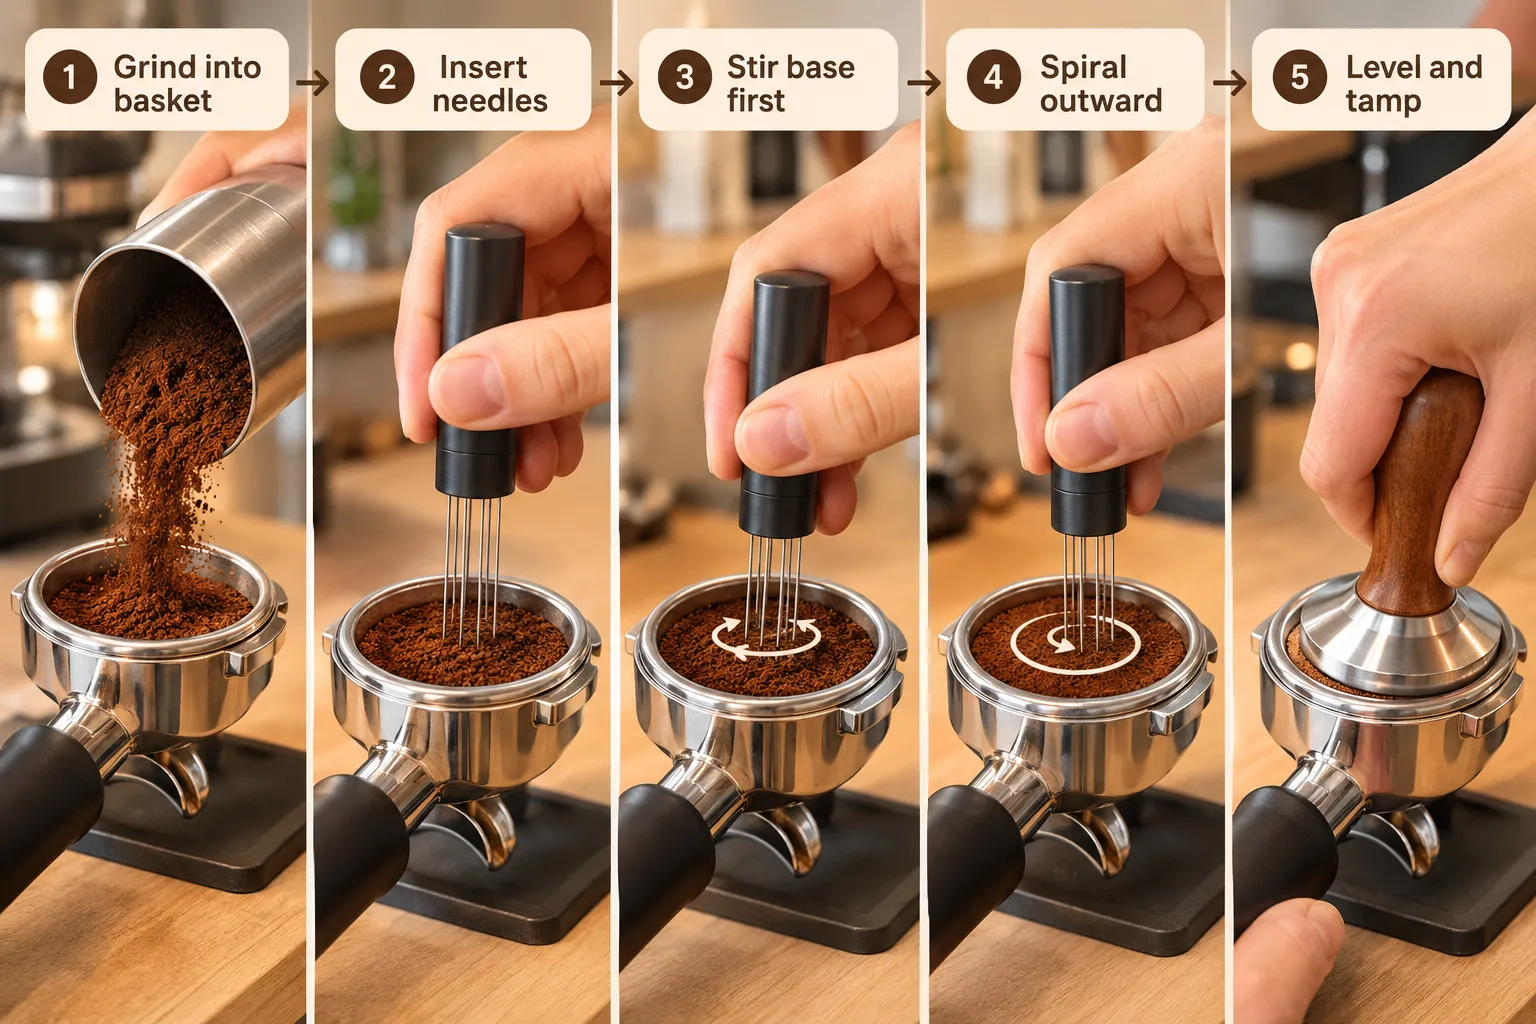
The method, step by step:
- Grind directly into the basket, or into a dosing cup and then into the basket. Either works.
- Give the basket a gentle tap on the counter first to settle the bed slightly. Do not slam it.
- Lower the needles until they nearly touch the basket floor. Shallow stirring only fixes the top layer, which is the single most common error.
- Make small circles, maybe 8 to 12, moving from the centre outward to the basket wall and back. Keep the tool close to vertical.
- Lift the tool straight up. Tapping it on the rim knocks loose grounds back in.
- Level the surface, with a distributor or a light tap, then tamp firmly and flat. WDT does not replace tamping; needles declump, a tamper compresses .
Common edge case: very light roasts ground finely can re-clump when you lift the tool. Stir slightly slower and lift more gently.
New to pulling shots at all? The Gaggia Classic Pro beginner walkthrough covers the full routine this step fits into.
What needle size should a wdt tool have?
Aim for 0.3 mm to 0.4 mm needles. Thinner needles drag less coffee behind them and leave fewer voids; thicker needles are stiffer and survive clumsy handling but can push grounds around rather than through.
| Needle diameter | Behaviour | Best for |
|---|---|---|
| 0.25 to 0.30 mm | Very low drag, delicate, bends if dropped | Light roasts, careful users, Normcore V3 owners |
| 0.35 mm | The common sweet spot; low drag, reasonably durable | Most home baristas |
| 0.40 mm | Stiffer, slightly more drag, hard to bend | Beginners, shared household tools |
| 0.50 mm and up | Noticeably moves clumps instead of separating them | Not recommended for espresso |
Needle count matters less than people assume. Three needles stirred properly beat nine needles waved across the surface. Most tools ship with five to nine; Normcore's V3 uses nine replaceable slots, and some premium 58 mm designs run 14 needles arranged in concentric circles.
Mistake to avoid: buying the thickest needles because they look sturdier. At 0.5 mm you are essentially stirring with a fork.
Best wdt tool brands under $20 and the retractable upgrade
For most buyers, the $9.99 generic stainless wdt tool on Amazon does the job. The $19.99 0.35 mm seven-needle version is the better pick if you want finer needles and a heavier handle, and the $29 Subminimal Flick earns its premium only because the needles retract.
| Tool | Price (Nov 5, 2026) | Reviews | Needles | Best for |
|---|---|---|---|---|
| Basic stainless wdt tool | $9.99 | 618 | ~0.4 mm | Most first-time buyers |
| 0.35 mm 7-needle tool | $19.99 | 1,682 | 0.35 mm | Light roasts, daily use |
| Subminimal Flick | $29.00 | 902 | Retractable | Shared counters, kids, travel |
Amazon prices checked November 5, 2026. Prices change. Check the current price before ordering.
Beyond those three, the category has been quietly adding engineering. MHW-3BOMBER's retractable design (first listed March 1, 2025) hides the needles behind a button. The ARO Orbit PRO uses a three-gear spirographic mechanism claimed to distribute grounds in roughly four spins (listed February 28, 2025). Rotary and geared models exist if you want one . Whether the mechanism beats a steady hand is unproven.
Five features worth paying for
- Replaceable needles. Needles bend. A tool with swappable slots outlives one with glued-in pins.
- Adjustable depth. A threaded collar lets you set the needles to just above the basket floor, so you stop scraping and stop stirring too shallow.
- A weighted handle. Heft keeps the tool vertical without effort, which makes the stir more even.
- A magnetic or weighted stand. Needles pointing up on a counter is a bad idea. A stand parks them safely and keeps them straight.
- Retraction. On the Subminimal Flick, needles withdraw into the body. That is the single best safety feature in the category.
What to watch out for
- Bent needles after one drop. Cheap tools have no stand and no retraction, and the needles are the whole product.
- Needles too long for your basket. A 58 mm double basket is shallow. Needles that bottom out scratch the mesh.
- Combo kits that bundle WDT with a distributor, tamper, and puck screen. They reduce steps, not necessarily channeling. Buy the pieces you need.
- Static. WDT does not stop static. A tiny spray of water on the beans before grinding handles that separately.
Can I make a DIY wdt tool at home, and what else works instead?
Yes. Push three to five straightened paperclips, sewing needles, or acupuncture needles into a wine cork and you have a functioning wdt tool for free. It performs the same mechanical task as the $9.99 version; it just feels worse and the needles work loose over time.
Other workable substitutes:
- A single sewing needle or toothpick. Slow, but it will break up clumps in a single basket.
- A fine wire whisk head. Works, though the wires are usually too thick for the best result.
- A small kitchen fork. The weakest option. Tines around 1 mm move clumps instead of separating them.
- The Ross Droplet Technique. Spritzing beans with a drop of water cuts static and reduces clumping at the source. It helps but does not redistribute an already uneven bed.
Decision rule: build the cork version first if you are unsure whether WDT helps you. If it improves your shots, spend the $9.99 on something that will not shed needles into your coffee.
the stirrer vs leveling tamper: what's the difference?
A the stirrer works through the full depth of the puck; a leveling tamper or wedge distributor works on the surface. They solve different problems and many baristas use both.
| the stirrer | Leveling tamper / distributor | |
|---|---|---|
| What it touches | The whole coffee bed, top to bottom | Top 2 to 5 mm |
| What it fixes | Clumps, density gradients, channeling origins | A sloped or ridged surface |
| Replaces tamping? | No | No, though some models double as a tamper |
| Typical price | $10 to $29 | $20 to $60 |
Espresso Academy's July 2026 analysis makes this depth distinction the central point, while noting its comparisons were internal educational tests, not peer-reviewed experiments. A spinning wedge distributor can actually compact the upper layer while leaving lumps underneath, which is why using one without WDT sometimes disappoints.
Order of operations: WDT, then level if you like, then tamp .
Will a the stirrer fix channeling, and does it work with single baskets?
A the stirrer fixes channeling caused by uneven grounds distribution, which is the most common cause in home setups. It will not fix channeling caused by a wrong grind size, a worn basket, an unlevel tamp, or too much coffee in the basket.
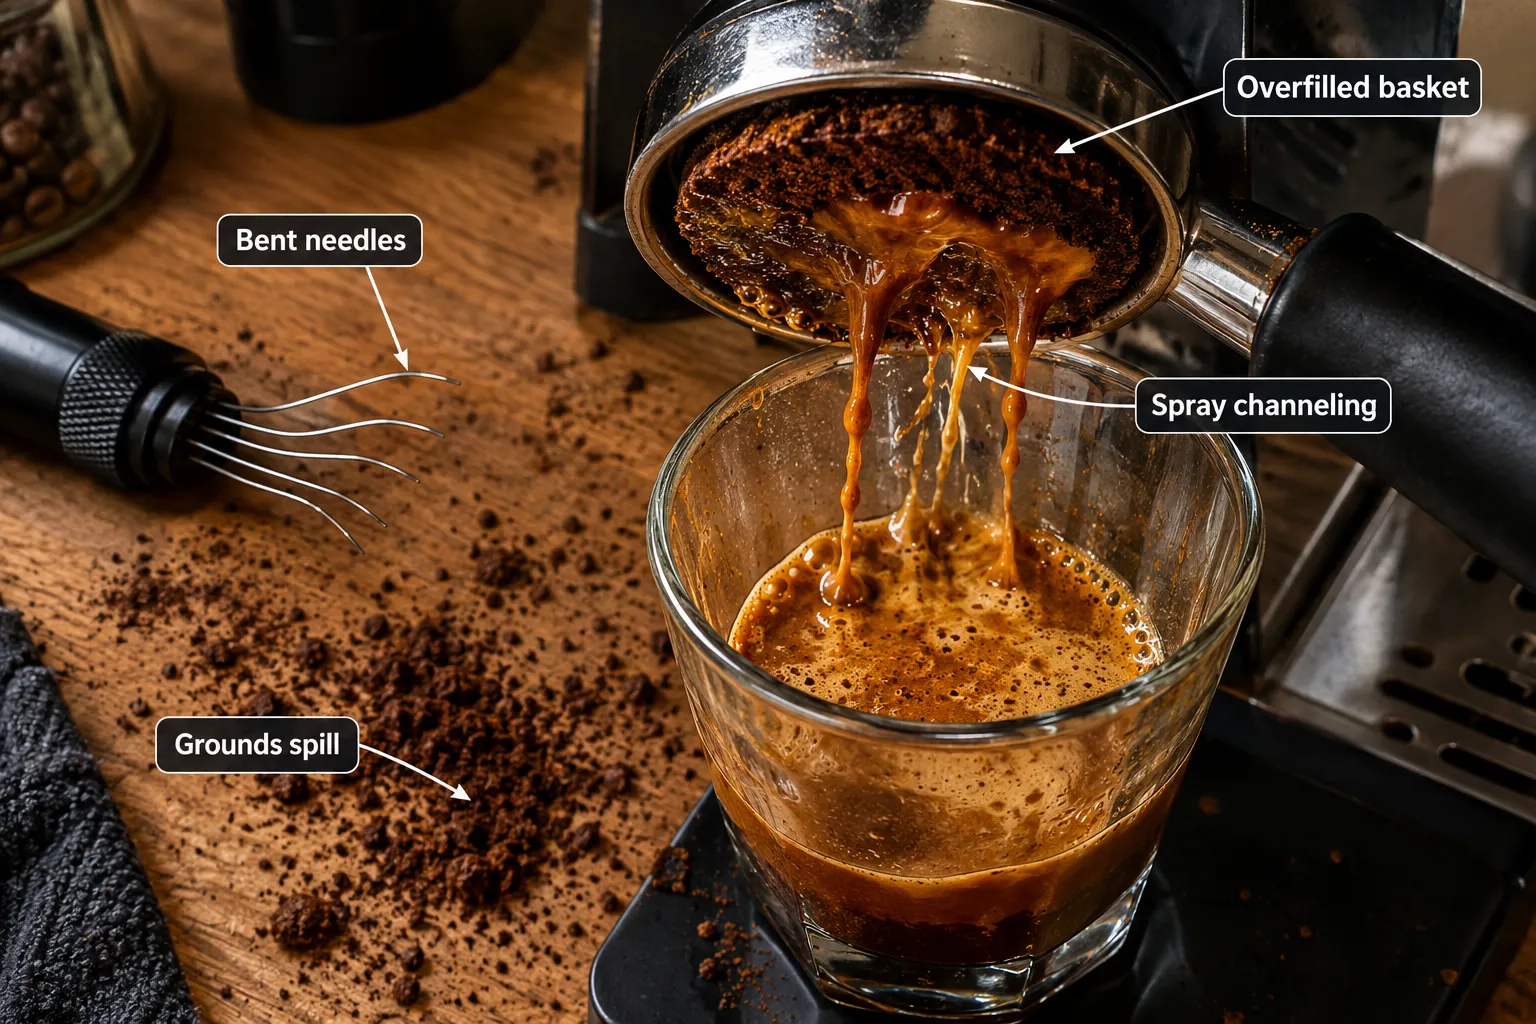
Channeling causes a the stirrer does not solve:
- Grind too coarse for your dose, so water blasts through regardless
- Overfilled basket touching the shower screen, which carves a divot
- Tamping at an angle
- Stale or degassing coffee (check the roast date; 7 to 21 days off roast is the usual window)
- A damaged or badly machined basket
For a broader fault-finding routine, see our espresso troubleshooting guide.
Single vs double baskets: WDT helps both, and arguably helps single baskets more. A single basket holding 7 to 9 grams has a shallow, narrow bed where one clump represents a larger share of the total. Those baskets are already channel-prone. Use fewer needles or a gentler touch so you do not scrape the mesh, and stir in smaller circles.
Triple and 18 to 22 gram baskets need a deeper stir and a couple more rotations, since there is more depth for density gradients to hide in.
Do I really need a the stirrer, or is it hype?
You need one if your grinder clumps, which most home grinders under $500 do. You do not need one if you use a super-automatic, a capsule machine, or a commercial-grade grinder with good anti-static and distribution.
Grinders that clump most:
- Single-dose grinders without a bellows or anti-static treatment
- Conical burr grinders used at espresso-fine settings with light roasts
- Any grinder whose chute is long, plastic, and dry in winter
- Built-in grinders on entry-level espresso machines that grind straight into the portafilter
Static rises when indoor air is dry, which is why people notice more clumping in January than July. If you are shopping grinders, our best espresso grinder roundup covers retention and distribution model by model.
Who should buy a the stirrer
- Owners of semi-automatic machines with a manual portafilter: Gaggia Classic Pro, Breville Bambino and Barista Express, Rancilio Silvia, Lelit and similar. Winner: the $9.99 basic tool.
- Anyone using a bottomless portafilter who sees spraying.
- Light-roast drinkers, where clumping and channeling hit hardest. Winner: the $19.99 0.35 mm tool.
- Households with kids or a crowded counter. Winner: the $29 Subminimal Flick, for the retracting needles alone.
- Gift buyers shopping for someone who already owns an espresso machine. A $10 to $29 accessory they will use daily beats another mug.
Who should skip it
- Super-automatic owners. The puck is sealed inside the brew group. Nothing to stir. See the best super automatic espresso machines if one-touch is your priority.
- Nespresso and capsule drinkers. No basket, no bed, no need.
- Pour over and French press brewers. Channeling at 1 bar behaves differently and WDT is not the fix.
- Anyone whose shots already taste right. Changing one thing at a time is better practice than buying one more thing.
Pros and cons
Pros
- Cheapest accessory that measurably reduces visible channeling
- Entry price of $9.99 as of November 5, 2026
- Adds under 15 seconds to the routine
- Works with every basket size from single to triple
- Easy to replicate as a DIY cork-and-needles tool
Cons
- No controlled published study yet quantifies its effect on extraction yield
- Needles bend and need replacing
- Exposed needles are a genuine hazard on a kitchen counter
- Can require a slightly coarser grind to keep shot times the same
- Does nothing for static, stale beans, or a bad grinder
Common mistakes people make with the stirrers
The biggest mistake is stirring only the surface. The second is stirring so aggressively that you fling grounds out of the basket.
- Stirring too shallow. Clumps near the basket floor cause the worst channels. Go nearly to the bottom.
- Overstirring. Twenty seconds of vigorous whisking compacts the bed and can make shot times unpredictable. Eight to twelve small circles is plenty.
- Tapping the tool on the basket rim, which bends needles and drops grounds unevenly.
- Skipping the tamp. Needles distribute; the tamper compresses .
- Not re-dialling the grind. More resistance usually means a slower shot. Coarsen one or two steps and re-time.
- Storing it needles-up in a drawer. Use a stand or buy a retractable model.
- Expecting it to rescue bad beans. Check the roast date first.
FAQ

Conclusion
Buy the $9.99 the stirrer. It is the lowest-cost change available to anyone pulling shots at home, the mechanism is sound, and the downside risk is ten dollars. If your counter is shared with children, spend $29 on the Subminimal Flick for the retracting needles. If you chase light roasts, the $19.99 0.35 mm tool is the better long-term pick. Prices checked on Amazon November 5, 2026; check the current price before ordering.
Be honest about what it does. A the stirrer fixes distribution. It will not fix stale beans, a bad grind setting, or an overfilled basket, and no published controlled study has yet put a number on its effect on extraction yield .
Next step: pull your next two shots with a bottomless portafilter, one without stirring and one with. Watch the underside of the basket. If the unstirred shot sprays and the stirred one pours a clean cone, you have your answer in about four minutes. Then re-dial your grind, because the stirred shot will likely run slow. Better Coffee Starts With Better Answers.
Affiliate disclosure: Coffee Rank IQ earns a commission from some product links. Prices and review counts were checked on Amazon on November 5, 2026 and change without notice. This article is based on published product specifications and documented research, not hands-on laboratory testing.
Which WDT needle size fits your setup?
Guidance based on needle drag and durability. Prices in the article checked Nov 5, 2026.‘+t+’
Stir nearly to the basket floor, 8 to 12 small circles, then level and tamp.’; } r.onchange=go;c.onchange=go;go(); })();