Milk Frothing Pitcher Size: 12 oz or 20 oz?
Quick Answer
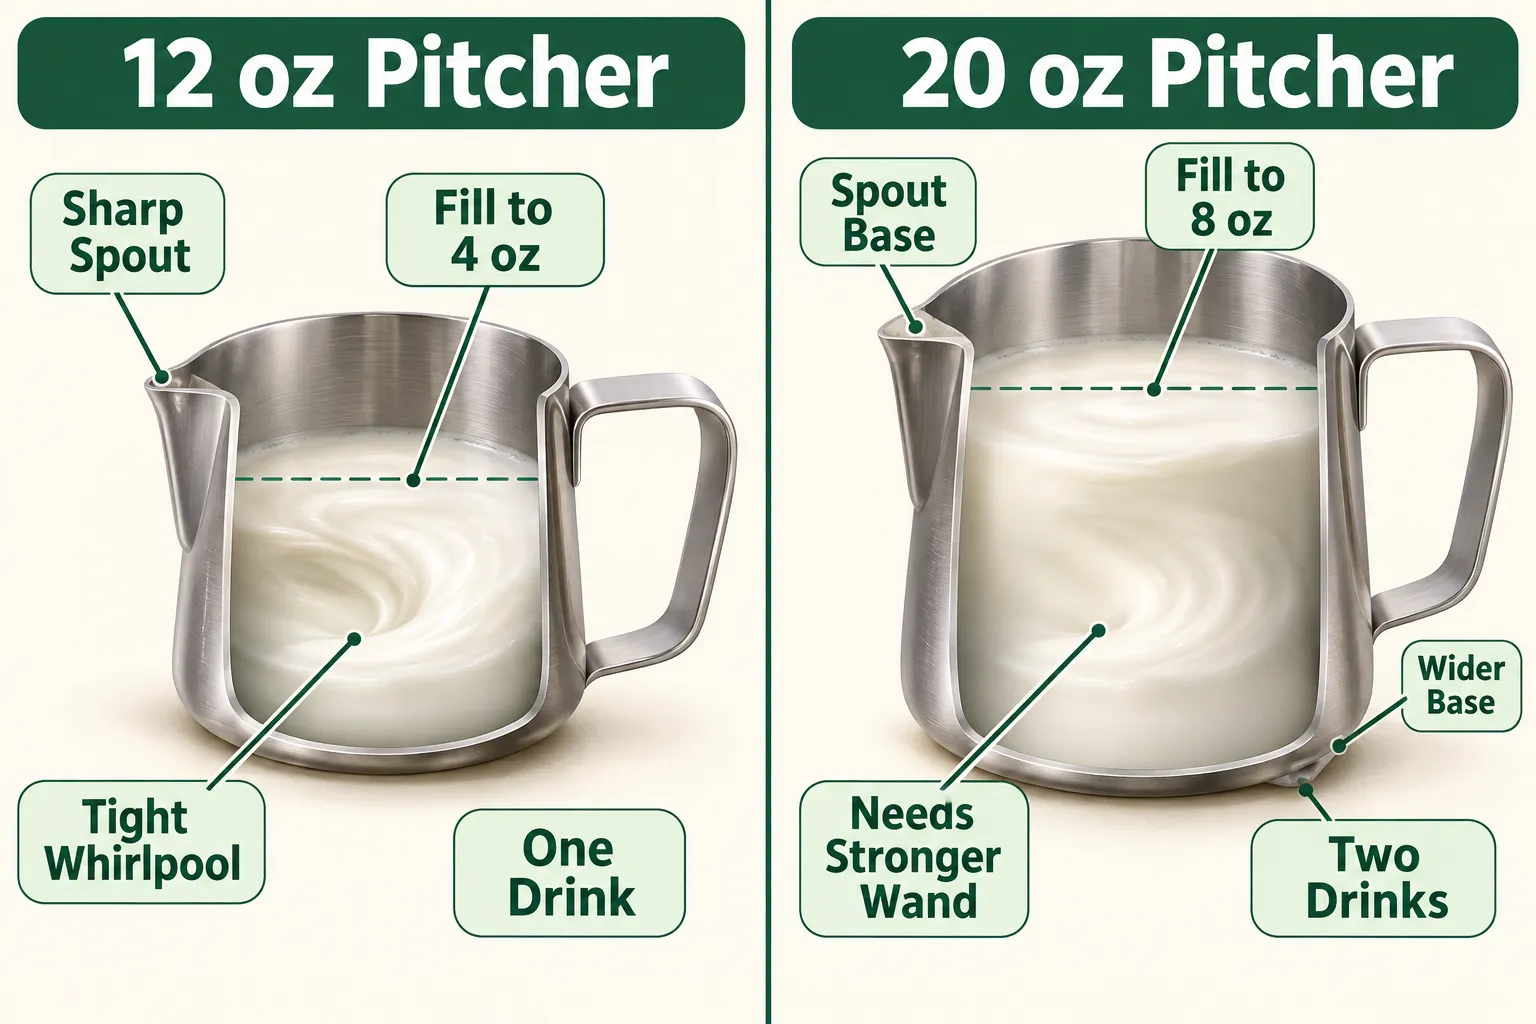
Buy the 12 oz if you make one milk drink at a time, and the 20 oz if you regularly make two. A 12 oz pitcher is not built to hold 12 oz of milk. Motta's size guide puts its working quantity at roughly 4 to 5 oz of cold milk, which expands to about 5 to 6 oz of textured milk . The 20 oz handles 8 to 12 oz of starting milk, enough for two cappuccinos or one 16 oz latte . Most home setups under $800 are happiest with the small one.
Key Takeaways
- 12 oz (350 ml) holds about 4 to 6 oz of cold milk and serves one cappuccino, flat white, or 8 oz latte .
- 20 oz (600 ml) holds about 8 to 12 oz of cold milk and serves two small drinks or one 16 oz latte .
- Fill to just below the base of the spout, which is roughly one third to just under one half of stated capacity .
- A basic stainless steel milk frothing pitcher cost $8.49 on Amazon, price checked November 5, 2026, with 12,593 reviews and over 7,000 bought in the past month .
- Kaffeemacher's KM Barista pitchers, listed October 31, 2026, run CHF 19.90 for the 350 ml and CHF 21.90 for the 600 ml; the 600 ml weighs 206.5 g versus 151 g.
- Acaia's Nova latte art pitcher, pre-orders opened October 2026, is 12 oz / 350 ml double-wall steel with a thermo contact zone, a signal that premium design is going small, not big.
- Beginners learning latte art do better with the 12 oz because the smaller milk volume reacts faster to wand and angle changes .
Does pitcher size affect how well milk froths?
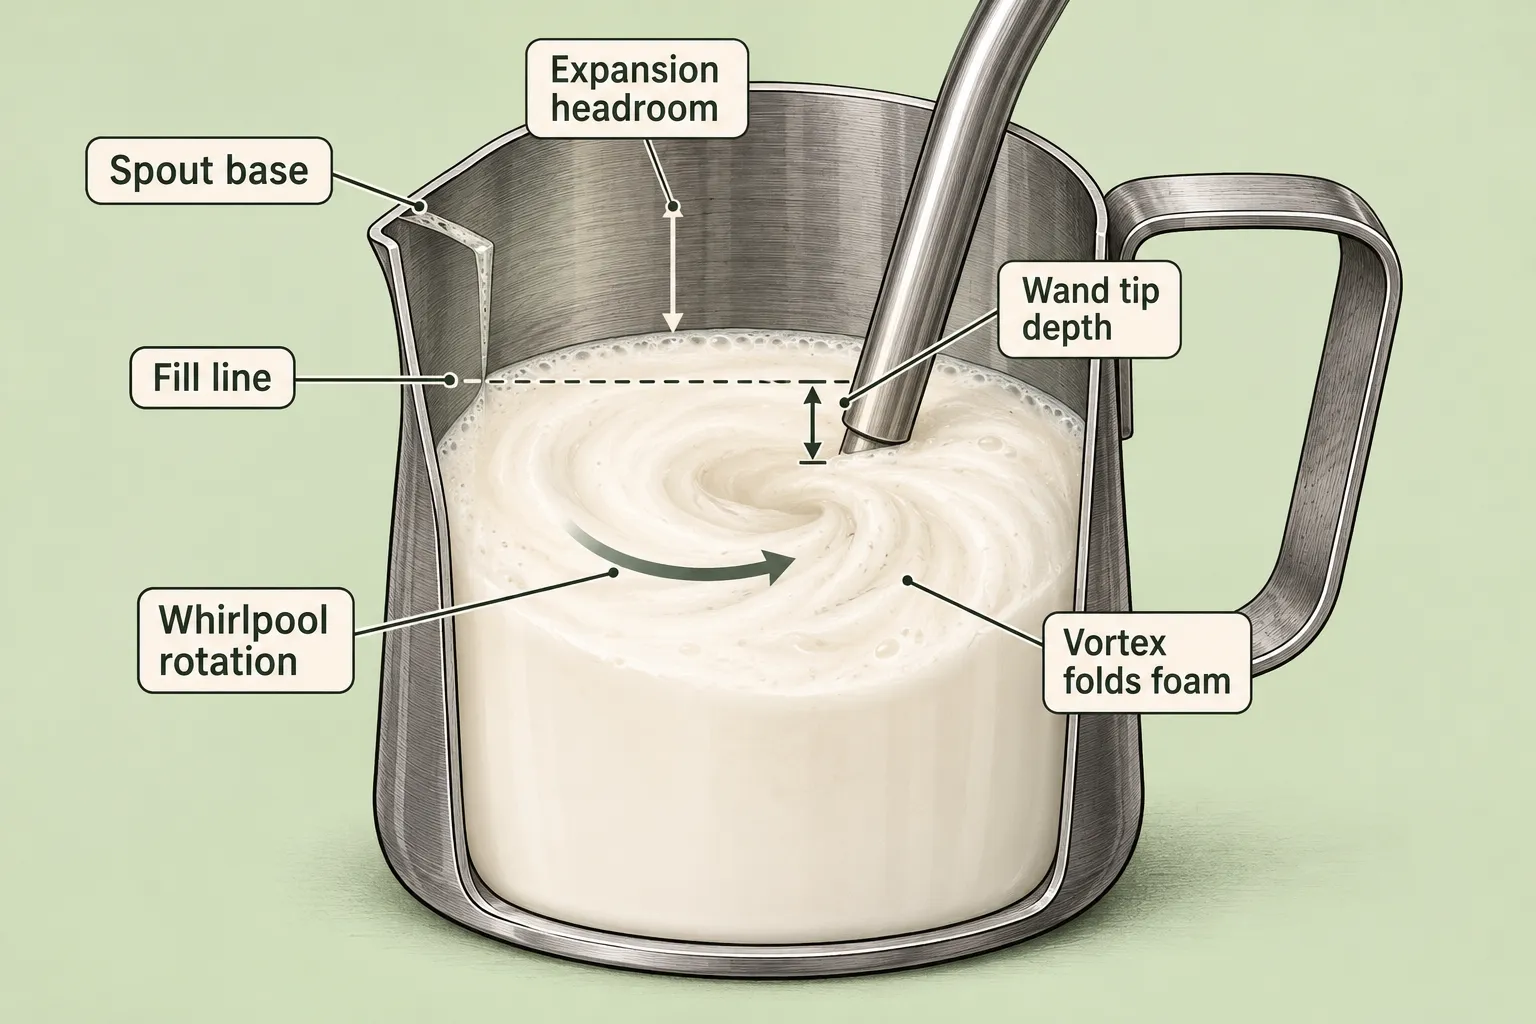
Yes, and more than most buyers expect. The texture comes from a spinning vortex of milk that folds air into itself. That vortex needs two things: enough steam power to get the milk moving, and the right milk volume relative to the pitcher's shape. Get the ratio wrong in either direction and the foam goes wrong with it.
Too much milk in a small pitcher and it climbs the walls and spills over the spout before it finishes texturing. Too little milk in a big pitcher and the wand tip sits near the bottom of a shallow puddle, so the milk never builds a whirlpool. It just chatters and makes dry, stiff bubbles that sit on top like shaving foam.
There's a second variable nobody mentions in the product listing: your steam wand. A single-hole wand on an entry machine like a Breville Bambino puts out modest steam pressure. Ask it to spin 10 oz of milk inside a 20 oz jug and it will take forever, and the milk will be scalded before the foam is right. A dual boiler with a three-hole tip will spin 12 oz happily.
Match the pitcher to your weakest link. If your steam wand is modest, your pitcher should be small.
Milk frothing pitcher size: what's the real difference between 12 oz and 20 oz?
The difference is drink count, not drink size. One 12 oz pitcher makes one milk drink well. One 20 oz pitcher makes two, or one very large one. The capacity printed on the side is the brim volume, not the milk volume, and that confusion is responsible for most of the overflowing kitchens in America.
Motta's October 2026 guidance is the cleanest version of the rule: use a 12 oz (35 cl) pitcher for one cappuccino or flat white, and a 17 to 20 oz (roughly 50 cl) pitcher for one large latte or two small milk drinks . Espresso Machine Lab lands in the same place, pairing 350 ml with 4 to 6 oz of starting milk and 600 ml with 8 to 12 oz .
Here's the practical breakdown by drink:
| Drink | Finished size | Cold milk to pour in | Pitcher |
|---|---|---|---|
| Cortado | 4.5 oz | 2.5 to 3 oz | 12 oz |
| Flat white | 6 oz | 4 oz | 12 oz |
| Cappuccino | 6 oz | 4 oz | 12 oz |
| Latte | 8 to 12 oz | 6 to 8 oz | 12 oz (8 oz drink) or 20 oz |
| Large latte | 16 oz | 10 to 12 oz | 20 oz |
| Two cappuccinos | 2 x 6 oz | 8 oz | 20 oz |
Note the overlap at the 8 oz latte. A 12 oz jug filled to 6 oz of cold milk is right at its ceiling but still workable. A 20 oz jug filled to 6 oz is below its comfortable floor. That gap is where most buying regret lives.
A 20 oz pitcher is also heavier and taller. Kaffeemacher lists its 600 ml KM Barista pitcher at 206.5 g against 151 g for the 350 ml model, and the internal scale on the big one stops at 450 ml because that is the recommended working quantity, not the brim. Fifty-five extra grams sounds trivial until you're holding the jug steady at pouring height with a wrist that isn't trained.
Which size milk pitcher is best for home espresso machines?
For the typical $300 to $1,500 home setup, the 12 oz is the better single purchase. Entry and mid-range machines have smaller steam boilers or thermoblocks, and they pair naturally with small milk volumes. A Bambino-class machine, a De'Longhi Dedica, a Gaggia Classic: all of them will texture 4 to 6 oz of milk cleanly and struggle with 12 oz.
Decision rule by machine class:
- Single-boiler thermoblock, one-hole steam tip (roughly $300 to $600): buy 12 oz. Steam output is designed around one drink.
- Heat exchanger or dual boiler, two or three-hole tip ($900 and up): 20 oz becomes genuinely useful, because the steam can keep up with 10 oz of milk.
- Super-automatic with a built-in milk carafe: you may not need a pitcher at all for daily drinks, though a 12 oz is still handy for manual texturing and hot chocolate. Our espresso machines with built-in grinders roundup covers which models include a manual wand alongside the auto system.
- No espresso machine, using a handheld or electric frother: size by the frother's own instructions, not by barista rules. The best milk frother comparison walks through the models that come with their own vessel.
Common mistake: buying the 20 oz because it looks more capable, then using it for a single flat white forever. A 20 oz jug with 4 oz of milk in it is a bad tool. The milk sits too shallow for a proper whirlpool, and the spout is too far above the cup for controlled latte art.
How much milk should you fill in a frothing pitcher?
Fill cold milk to just below the base of the spout. That is the professional default, and it works out to roughly one third to just under one half of the pitcher's stated capacity . Milk expands during steaming, so the headroom above the milk pitcher fill line is not wasted space, it's the room where foam gets made.
Target volumes, by pitcher:
- 12 oz pitcher: 4 oz cold milk for a cappuccino, 5 to 6 oz for a small latte. Finished volume lands near 5 to 6 oz .
- 20 oz pitcher: 8 oz for two cappuccinos, 10 to 12 oz for a 16 oz latte .
Some pitchers stamp an internal line. Kaffeemacher's 600 ml model scales to 450 ml, which is their recommended working quantity rather than brim capacity. If your jug has no line, pour 4 oz of water into the 12 oz once and photograph where it sits. You'll never measure again.
Edge case: oat and other plant milks expand slightly differently and scorch faster. Start 0.5 oz lower in the pitcher and pull the wand out a little earlier. Barista-formulated oat milk with added protein behaves closest to dairy.
Can you froth milk in a 12 oz pitcher for large lattes?
Not comfortably. A 16 oz latte needs about 10 to 12 oz of cold milk, and a 12 oz pitcher tops out near 6 oz before the vortex breaks and milk spills over the spout . You can texture 6 oz, pour it, then steam a second batch, but the second batch will never match the first and your drink will be half foam, half flat.
Two workable options if 16 oz lattes are your regular order:
- Buy the 20 oz as your primary jug and accept slightly harder latte art. Add a 12 oz later if you catch the art bug.
- Shrink the drink. A lot of café-escapee buyers discover that an 8 oz latte with a double shot tastes considerably better than a 16 oz one, because the espresso isn't drowned. If you've never tried the smaller end, the cortado explainer and the guide to milk-based coffee drinks are worth ten minutes before you buy hardware.
Reverse edge case: a 20 oz pitcher can make a single 6 oz cappuccino if you must, but the shallow milk and the long reach from spout to cup will cost you the rosetta.
What size milk pitcher do professional baristas use?
Working cafés usually keep three: a 12 oz for single drinks and art, a 20 oz for pairs, and a 32 oz or larger for busy service or big orders. The house default on a café bar is typically the 20 oz, because two drinks at once is the standard ticket. Latte art competitors, though, trend small.
The 2026 product releases make the point. Acaia opened pre-orders for its Nova latte art pitcher in October 2026 at 12 oz / 350 ml, with double-wall stainless steel, a patent-pending thermo contact zone, and tactile temperature feedback through the body. Both the Flow and planned Stack versions are 350 ml. Acaia spent its engineering budget on control of height, angle, and rotation rather than on capacity.
Kaffeemacher's KM Barista pitchers, introduced the same month and developed with German Barista Champion 2024 Felix Hohlmann and academy director Benjamin Hohlmann, come in exactly two sizes: 350 ml for one cappuccino and 600 ml for two. That's the professional split stated plainly by people who run training academies.
If you want the full workflow behind that, the advanced barista training manual covers milk texturing alongside the rest of the bar routine.
Is 12 oz or 20 oz better for beginners learning to froth milk?
The 12 oz. Motta specifically identifies it as the easier size for beginners learning latte art , and the physics behind that is simple: less milk responds faster, so you get quicker feedback on every mistake. The spout also sits closer to the cup surface when you pour, which is most of the battle in a first rosetta.

Three specific beginner advantages:
- Cheaper mistakes. 4 oz of milk down the drain stings less than 12 oz, and you'll dump a lot of early attempts.
- Faster reps. A 12 oz batch steams in roughly 15 to 20 seconds on most home machines. More attempts per practice session.
- Visible vortex. With the right fill, you can actually watch the whirlpool form, which teaches wand depth better than any video.
The one argument for starting with 20 oz: if you live with someone and you're both drinking lattes every morning, two separate steaming cycles before work gets old fast. Household size beats skill-building in that case.
Does the milk pitcher spout shape matter for latte art?
More than the size does, once you're past the basics. A tight, sharply tapered spout concentrates the milk into a narrow stream, which gives you crisp definition on a tulip or rosetta. A wide, rounded spout spreads the flow and is more forgiving for simple hearts and for general pouring.
What to look at on a product page:
- Narrow tapered spout: best for a milk jug for latte art, detailed patterns, experienced hands.
- Rounded or wider spout: easier for beginners, better for plain pouring and for plant milks that run thinner.
- Spout base height: this is your fill reference. A spout that starts low on the body means less usable milk volume than the stated capacity suggests.
- Handle shape: a welded handle with a thumb rest gives you consistent wrist angle. Cheap stamped handles rotate in the hand.
Five features worth paying for on a milk frothing pitcher
- 18/8 or 304 stainless steel body. Food-safe, holds no odor, survives dishwashers. Steel also transmits temperature to your hand, which is a free thermometer.
- A tapered spout with a defined tip. Gives you a controllable stream instead of a sheet of milk.
- A welded, non-hollow handle. Hollow handles trap water and rattle. Welded handles stay put through thousands of pours.
- An internal fill marking. Removes the guesswork from the milk pitcher fill line, which is the single most common beginner error.
- A flat, heavy base. Keeps the pitcher stable on the counter and spreads heat evenly so the bottom milk doesn't scorch first.
What to watch out for
- Thin-gauge steel. Cheap jugs dent on the first drop and the dent ruins the vortex.
- Double-wall insulation. Great for keeping milk hot, bad for learning, because you lose the hand-feel that tells you when to stop steaming. Acaia's Nova works around this with a dedicated contact zone, but generic double-wall jugs just blind you.
- Plastic measurement windows. They stain and they're a cleaning liability.
- Non-stick coatings. Unnecessary on milk, and they scratch.
- Capacity marketing. A jug sold as "20 oz, makes 4 lattes" is selling you brim volume. It makes two.
Safety note: no milk-pitcher-specific recall or new regulation turned up in the October 1 to November 6, 2026 window. The standing practice is ordinary food-contact hygiene, rinse immediately after steaming, and never let milk proteins dry on the steel. For future product-specific checks, the US Consumer Product Safety Commission recall database is the authoritative place to look.
Why isn't my milk frothing properly in my pitcher?
Nine times out of ten it's volume, wand depth, or wand angle. Work through them in that order before you blame the machine or the milk.
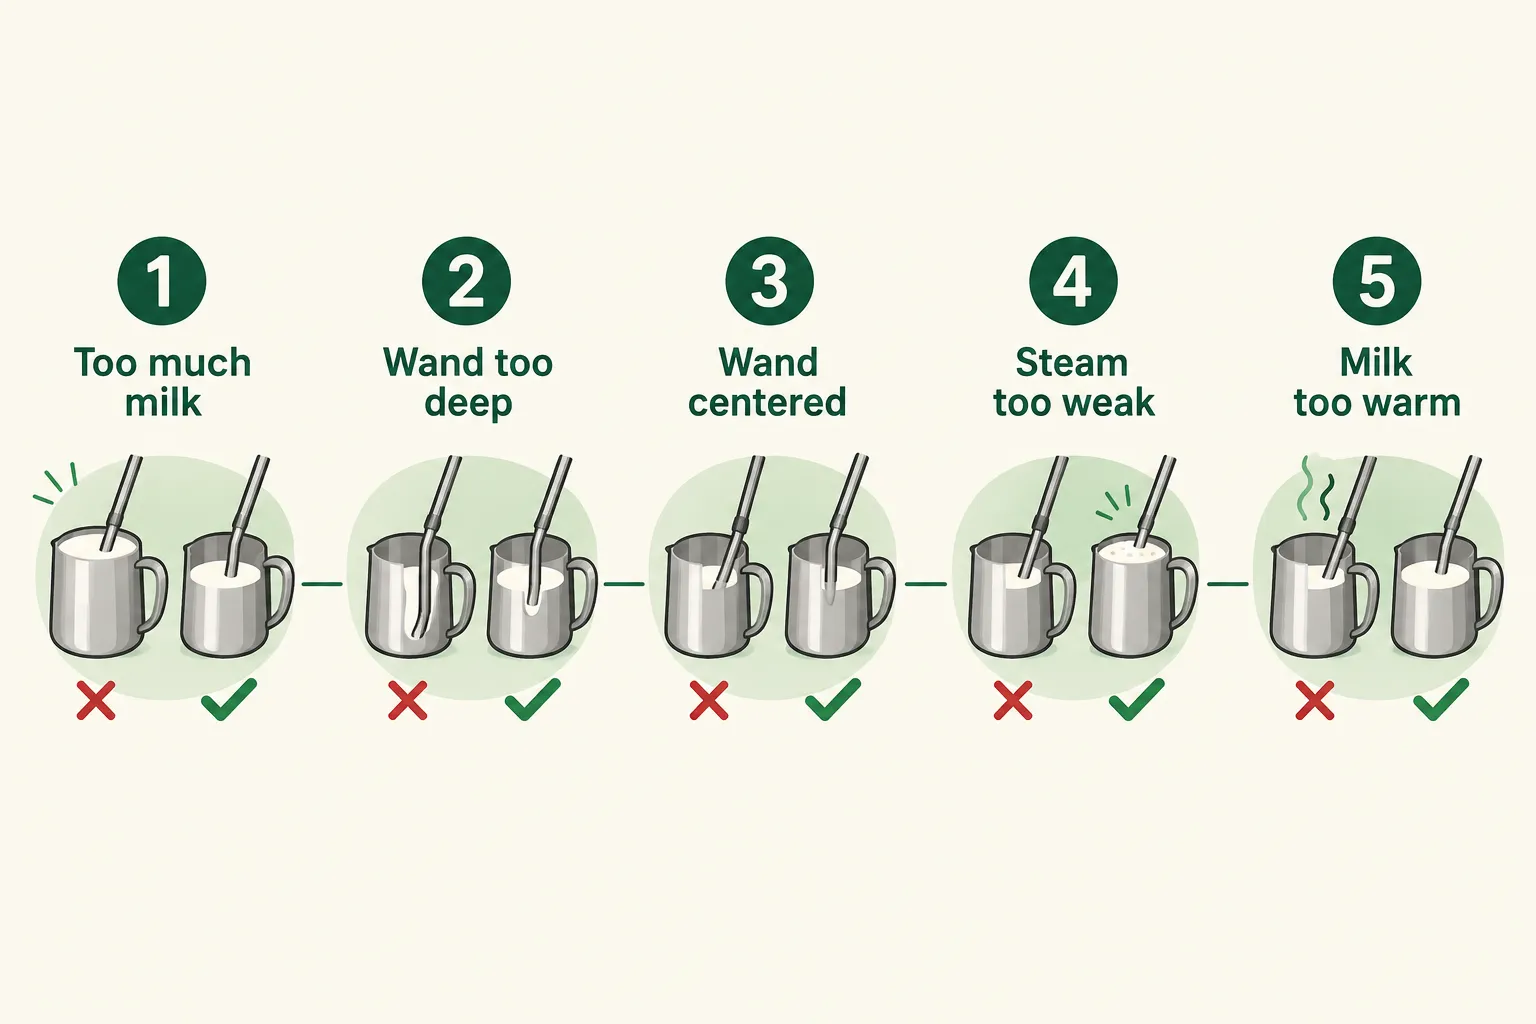
| Symptom | Likely cause | Fix |
|---|---|---|
| Big dry bubbles, stiff foam | Wand tip too close to surface, too long | Submerge tip slightly deeper after 3 seconds of air |
| No foam at all, just hot milk | Wand tip too deep from the start | Start with the tip just under the surface until you hear a tearing sound |
| Milk spins but won't texture | Wand centered in the pitcher | Angle the tip off-center so milk rotates |
| Milk overflows | Overfilled past the spout base | Fill below the spout base, around 4 oz in a 12 oz jug |
| Takes forever, milk scalds | Too much milk for the steam wand | Drop to a 12 oz pitcher and less milk |
| Foam separates in 20 seconds | Not enough air, or milk over 155 F | Add air earlier, stop steaming when the jug is too hot to hold |
One overlooked cause: starting milk temperature. Cold milk straight from the fridge at around 38 F gives you a longer window to add air before the proteins stop holding it. Milk that's been on the counter for ten minutes gives you a fraction of that window.
Can you use a larger pitcher if you only make one drink at a time?
You can, but it's the worse tool. A 20 oz pitcher holding 4 oz of milk leaves the liquid too shallow for the steam wand to establish a whirlpool, so you get uneven, bubbly foam instead of glossy microfoam. The long reach from spout to cup surface also makes latte art harder.
If you already own the 20 oz and don't want to buy another, two workarounds help:
- Angle the pitcher steeply during steaming so the milk pools deeper on one side and the wand tip stays submerged in moving liquid.
- Steam slightly more milk than you need and discard the excess. Wasteful, but it beats bad foam.
Choose this way: if more than one in four of your drinks is made in a pair, get the 20 oz. If you drink alone, get the 12 oz and skip the workarounds.
Are there milk frothing pitchers in other sizes besides 12 and 20 oz?
Yes. The common ladder runs 8 oz, 12 oz, 20 oz, 32 oz, and 50 oz, with metric equivalents at 240, 350, 600, 950, and 1500 ml. The two sizes in this article dominate because they map to the two most common situations: one drink and two drinks.
- 8 oz / 240 ml: for a single cortado or macchiato, about 2 to 3 oz of milk. Specialist. Pleasant for practice, too small for a latte.
- 12 oz / 350 ml: the home default and the latte art standard .
- 20 oz / 600 ml: two drinks or one large .
- 32 oz / 950 ml: café service volume. On a home machine the steam wand simply cannot spin this much milk in reasonable time.
- 50 oz and up: catering and batch steaming only.
A 12 oz plus a 20 oz costs under $30 together at the budget end and covers everything a home kitchen will realistically ask for.
How much does a 20 oz milk frothing pitcher cost, and which should you buy?
Budget stainless steaming pitchers start around $8 to $15 in either size, mid-range barista pitchers run roughly CHF 20 to $45, and design-led models go past $100.
A basic stainless steel milk frothing pitcher was $8.49 on Amazon, price checked November 5, 2026, carrying 12,593 ratings with over 7,000 bought in the past month . Kaffeemacher's prices, listed October 31, 2026, were CHF 19.90 for the 350 ml and CHF 21.90 for the 600 ml. The 600 ml costs about CHF 2 more than the 350 ml, which tells you size is not where the money goes. Materials, spout engineering, and handle construction are.
| Pitcher | Size | Price (date checked) | Best for |
|---|---|---|---|
| Generic stainless steaming pitcher (Amazon) | 12 oz / 20 oz | $8.49, Nov 5 2026 | First pitcher, practice, budget setups |
| Kaffeemacher KM Barista | 350 ml (151 g) | CHF 19.90, Oct 31 2026 | One cappuccino, latte art practice |
| Kaffeemacher KM Barista | 600 ml (206.5 g) | CHF 21.90, Oct 31 2026 | Two cappuccinos, 450 ml working scale |
| Acaia Nova (Flow) | 350 ml double-wall | Pre-order opened Oct 2026, check current price | Latte art, temperature feedback |
Affiliate disclosure: Coffee Rank IQ earns commission on some product links. Prices and availability change; check the current price before buying.
Who should buy which
- One drink at a time, learning latte art: 12 oz. Clear winner.
- Two morning drinks in a household: 20 oz, and add a 12 oz when you start practicing art.
- 16 oz latte drinkers: 20 oz, no contest.
- Super-automatic owners: skip both unless you want manual control. Keurig's Alta System, launched October 29, 2026 at $499.99, includes an integrated frother and espresso up to 10 bars, which trades texture control for speed.
- Gift buyers: 12 oz plus a bag of fresh beans. It suits a wider range of machines and skill levels.
Pros and cons
12 oz pitcher
- Pros: easier latte art, faster steaming, cheaper milk mistakes, lighter in the hand, fits small wands.
- Cons: caps out near 6 oz of milk, no good for pairs or 16 oz drinks.
20 oz pitcher
- Pros: two drinks in one cycle, handles 16 oz lattes, fewer rounds on busy mornings.
- Cons: needs real steam power, heavier (206.5 g on the Kaffeemacher 600 ml), harder to pour art, poor at low fills.
FAQ

Milk pitcher size calculator
Which milk frothing pitcher do you need?
‘+note; });
Conclusion
Buy the 12 oz milk frothing pitcher unless you routinely make two drinks or a 16 oz latte. It matches the steam output of nearly every home machine under $800, it teaches milk texture faster, and at $8.49 for a basic stainless model (checked November 5, 2026) the cost of being wrong is one sandwich . The 20 oz earns its place in two-drink households and on machines with real steam pressure.
Next step: pour 4 oz of water into whatever pitcher you own and mark where it sits relative to the spout base. That one line will fix more foam problems than a new jug will. Then work through the advanced espresso technique guide and put the practice milk to use.