
12 Coffee Station Ideas for Small Kitchens
A Keurig K-Mini measures 4.5 inches wide and 12.1 inches tall, but flip the lid open to add water and it needs 16.8 inches of vertical clearance. That single spec sinks more small kitchen coffee station ideas than any design mistake involving color or trays. The cabinet above the counter sits 18 inches up. The brewer fits. The lid does not.
That is the whole game in a small kitchen: measuring the thing you forgot to measure. The good news is that 83% of past-day coffee drinkers in the National Coffee Association's Fall 2026 report had their coffee at home, which means a station built around daily speed beats one built around photographs. These twelve layouts are organized by the machine you actually own, because the machine sets the footprint and everything else follows.
Key Takeaways
- Pick your layout by machine type first. A pod brewer needs 6 inches of width; an espresso setup with a separate grinder needs 24 to 30.
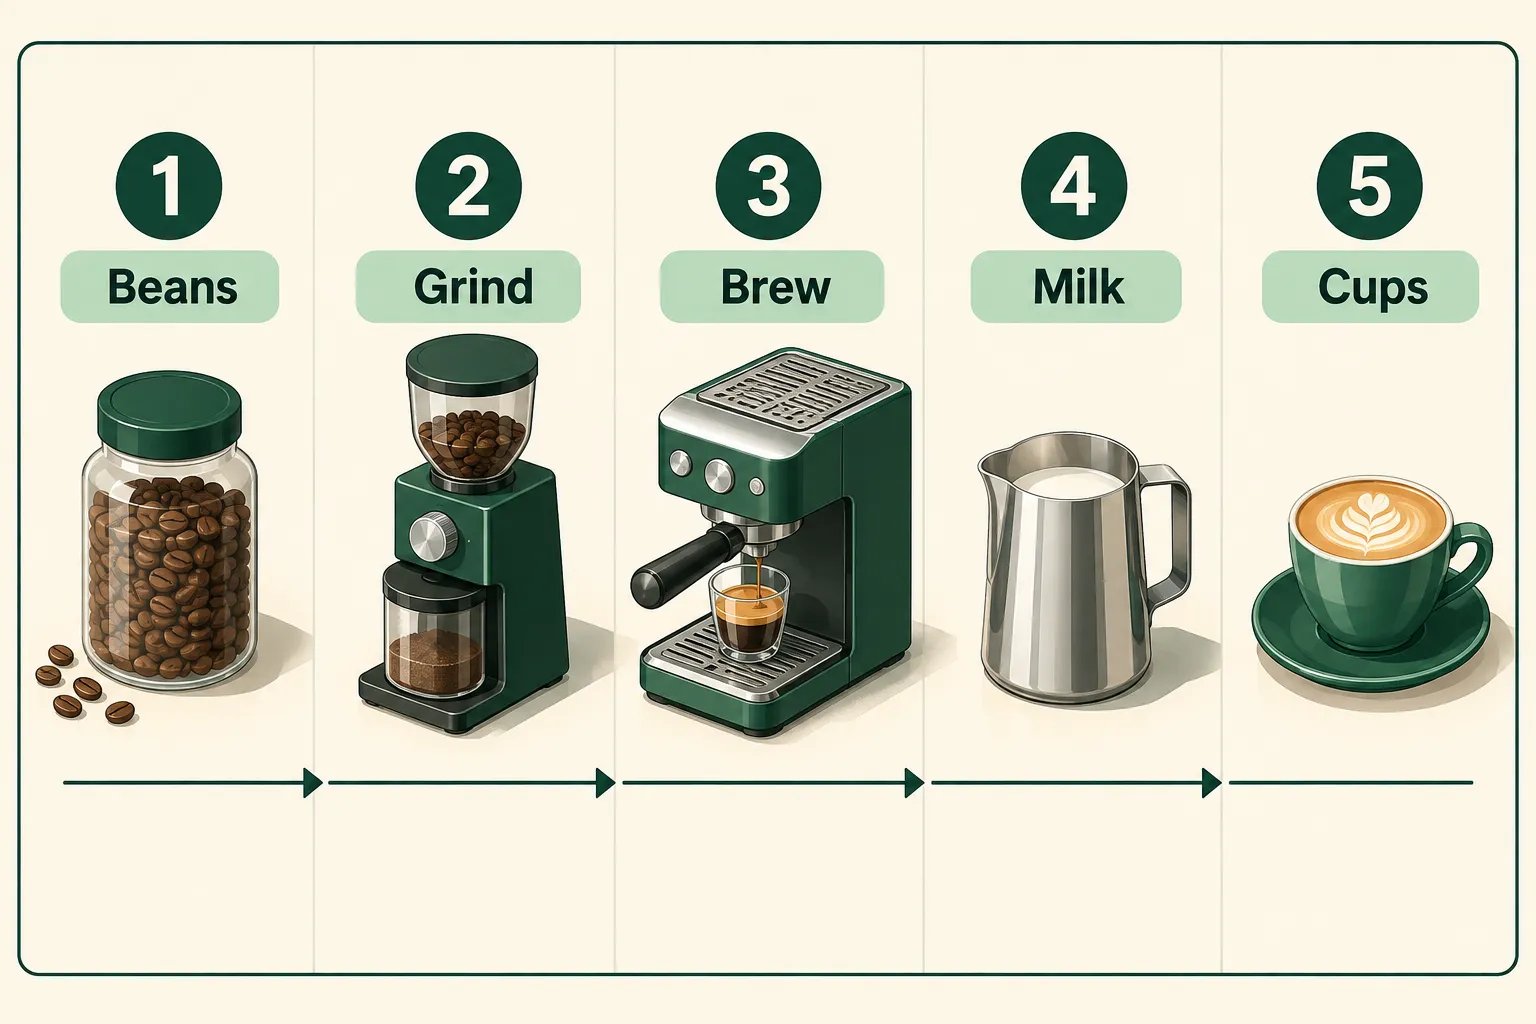
- Keep the workflow in one direction: beans, grind, brew, milk, cups. Crossing your own path is what makes a small coffee corner feel chaotic.
- Vertical clearance matters as much as counter width. Measure lid height, water tank lift, and portafilter swing before you buy.
- The cheapest functional station costs under $40 in organizers. A Mind Reader condiment station ran $15.39 and a pod drawer $15.81 on Amazon, checked November 5, 2026.
- Drip brewers accounted for 38% of past-day preparation methods in NCA 2025 data, so most households are better served by a compact drip corner than an espresso build.
- Renters get more from a rolling cart or a cabinet-interior station than from anything that requires a drill.
- Clutter comes from open bags, loose pods, and visible cords. Contain those three and the station looks intentional.
Coffee Station Ideas That Actually Fit a Small Kitchen
A coffee station is a defined spot where everything you need to make a drink lives within arm's reach. Nothing more romantic than that. The practical test is whether you can go from "awake" to "holding a cup" without opening four cabinets.
A basic station needs five things: the brewer, a sealed container for beans or pods, a water source or filled pitcher, cups, and a small waste path for grounds or used pods. Add a grinder and a scale if you grind fresh. Add milk and a frother if you drink lattes. That is the entire list, and it is shorter than most Pinterest boards suggest.
Counter space requirements scale with the machine. A pod brewer station works in 12 inches of linear counter. A drip station wants 18 to 24. An espresso setup with a separate burr grinder realistically needs 24 to 30 inches of width and about 16 inches of depth, plus overhead room to lift the water tank.
The order of operations should run one direction along that counter: beans, grind, brew, milk, cups. Right-handed people usually like it running left to right. The point is that you never reach back over a hot machine or a wet puddle.
Should you build a coffee station at all, or just keep the machine on the counter? If you drink one cup a day from a pod brewer, the machine plus a lidded pod box is a station. The organizing effort pays off when there are more than four objects involved, or more than one person making drinks before work.
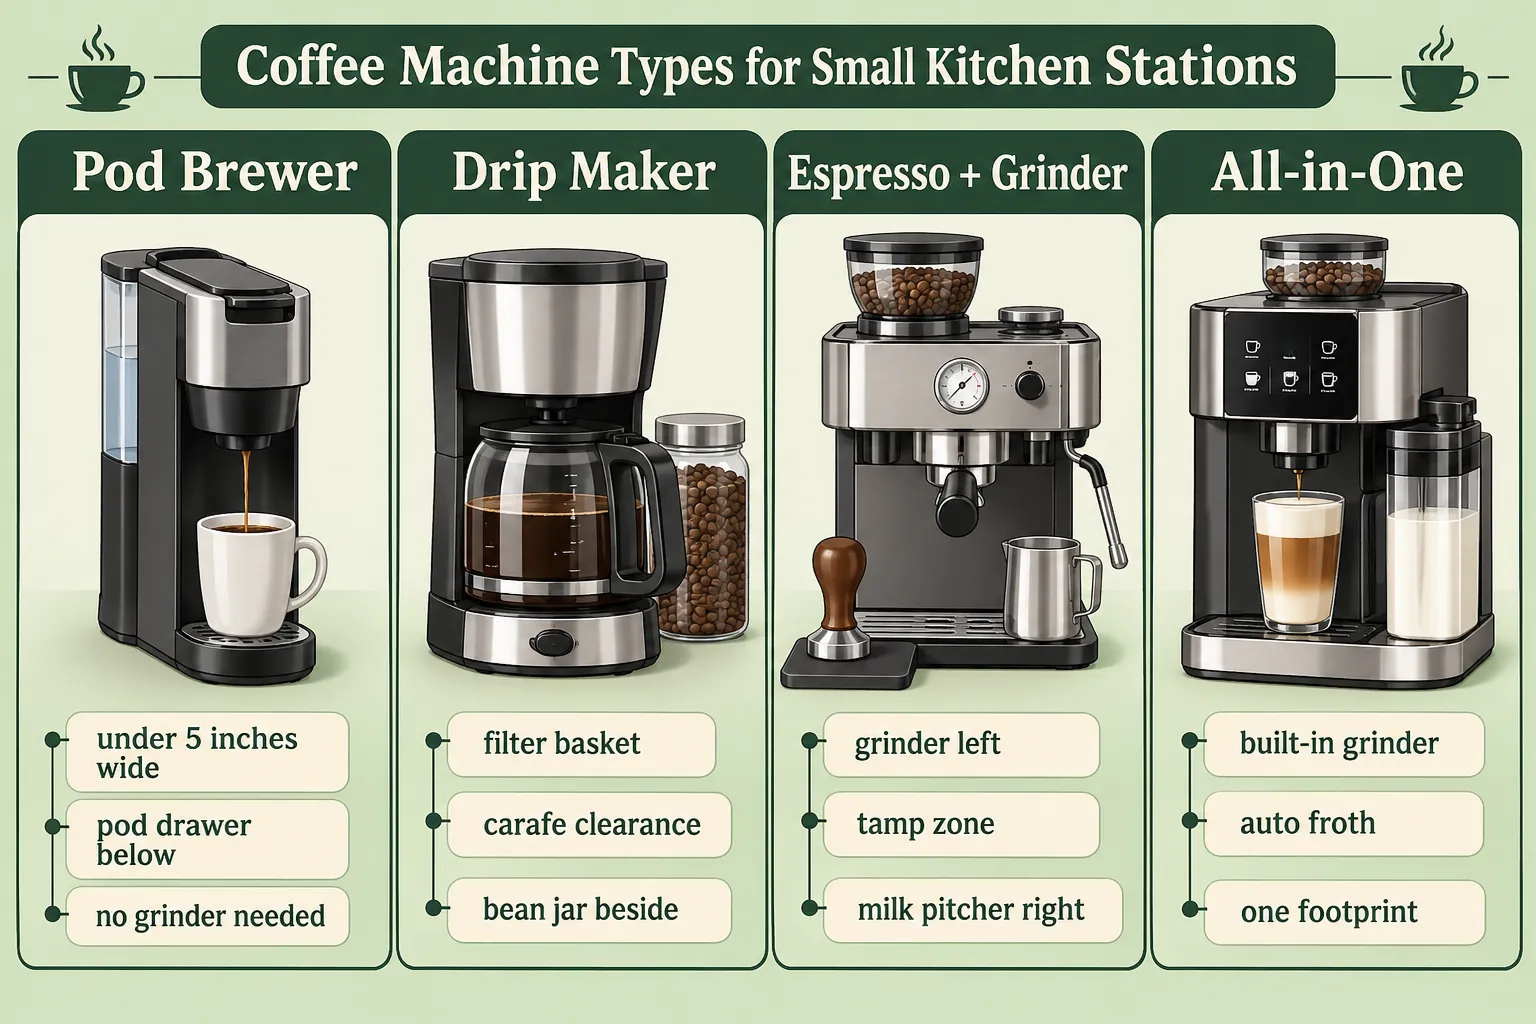
These coffee station ideas are grouped by machine type because that is what determines footprint, cord position, and mess pattern.
1. The Pod Brewer Strip: 6 to 12 Inches of Counter
Start here if you own a Keurig, Nespresso, or similar single-serve machine. Keurig lists the K-Mini at 4.5 inches wide, 11.3 deep, and 12.1 high, rising to 16.8 inches with the water lid open. A November 5, 2026 Target promotion put the $100 K-Mini Go at $49, which AL.com flagged as apartment and dorm friendly specifically because of that sub-five-inch width.
The layout is a vertical strip rather than a horizontal bar. Machine on the counter. Pods in a shallow drawer underneath the machine or in a drawer organizer in the cabinet below. Mugs on a hook or a small shelf above.
A pod drawer that the machine sits on top of was $15.81 on Amazon as of November 5, 2026, and it is the single highest-value purchase in this whole article. It turns the brewer's own footprint into pod storage, which is the only free square footage a small kitchen offers.
One warning specific to pod machines: check the clearance above before you commit to the spot. If the cabinet sits 15 inches above the counter, the K-Mini's open lid will not clear it, and you will end up sliding the machine forward every morning. That daily friction is how stations get abandoned.
Waste path matters too. Used pods are wet. Keep a small covered bin within reach or the counter develops a sticky ring.
2. The Drip Corner: 18 to 24 Inches on an L-Shaped Counter
Drip brewers were the most common preparation method in NCA 2025 data at 38% of past-day brewing, ahead of single-cup at 23%, cold brew at 17%, and espresso machines at 11%. For most US households a compact drip corner is the honest answer, and it photographs perfectly well.
Use the inside of an L-shaped counter, where the two runs meet. That corner is usually dead space because nothing deep fits there comfortably. A drip maker does, because its depth is its own problem rather than yours.
Set the carafe side facing out so you pour without reaching across the hot plate. Filters go in the drawer directly below, not in a decorative canister on the counter. A tall lidded jar holds ground coffee or whole beans. If you want to see what a different filter shape does to the brew, flat bottom paper filters behave differently from cones in extraction evenness.
Mugs live on the counter behind the machine in a stack of three, maximum. Six mugs on a tree is a dust collector in a small kitchen.
Watch the steam. Drip brewers vent upward during the brew cycle, and running that against the underside of a wood cabinet for five minutes a day will dull the finish over a year or two. Pull the machine forward two inches or move it to a spot without an overhead cabinet.
3. The Espresso and Grinder Line: 24 to 30 Inches, Workflow Left to Right
This is the layout for a $300 to $1,500 setup with a separate machine and grinder. It is also the layout people get wrong most often, because they place the grinder wherever it fit rather than where the hands go.
Run it in a straight line. Bean jar at the far left. Grinder next. Espresso machine in the middle with the portafilter swing clear of both. Milk pitcher and frothing space to the right of the steam wand. Cups at the far right or on a shelf above.
That order, beans, grind, brew, milk, cups, means you never carry a loaded portafilter backwards past a milk jug. It sounds fussy until you have knocked a full pitcher into a drip tray at 7am.
Depth is the sneaky constraint. Most home espresso machines run 11 to 14 inches deep, and you need another 3 to 4 inches behind for the water tank to lift out or the rear cord to bend. Measure 16 inches of usable depth before you buy. Many kitchen counters are 25 inches deep, so this is usually fine, but a peninsula or a shallow apartment counter may not be.
A small scale belongs here too, flat on the counter under the portafilter. Dialing in brew ratio by weight rather than by eye is the difference between a repeatable shot and a daily lottery.
Keep a damp cloth and a knock box in the zone. Grounds migrate. The cleaning habits baristas use translate well to a home counter, mostly because they are built around wiping as you go rather than scrubbing later.
4. The All-in-One Footprint: One Machine Replacing Three
If the counter genuinely cannot hold a line of separate tools, buy fewer tools. Ninja launched the Luxe Café Mini Plus on June 10, 2026, and TechRadar reported it combines espresso, filter coffee, automatic or manual milk frothing, a built-in grinder, and dosage guidance in one body, listed at $499.99 against $549.99 for the Premier and $699.99 for the Pro .
The size difference is the point. TechRadar lists the Luxe Café Mini Pro at 13.4 by 10.1 by 12.2 inches and the Premier at 14.6 by 13.2 by 13.5 inches . Ten inches of depth on a kitchen counter is a meaningfully different object from thirteen.
Further up the price range, JURA introduced a compact bean-to-cup machine in October 2026 with 17 drink specialties, according to a Yahoo Shopping report dated October 15 . That report does not give a verified US price or full dimensions, so treat it as a direction the category is moving rather than a recommendation with numbers attached.
The tradeoff with all-in-one machines is honest and worth saying plainly: a built-in grinder is usually less adjustable than a dedicated one, and you cannot upgrade half the setup later. If you want to tinker with grind size across multiple brew methods, separates serve you better. If you want a flat white before a 9am call, the single body wins on counter space and on dishes.
Compare the models on footprint first, feature list second. A machine you have to shuffle is a machine you stop using.
5. The Cabinet Interior Station: Zero Permanent Counter Space
For kitchens where counter space is genuinely spoken for, the station lives inside a lower or upper cabinet and comes out only when used.
Dedicate one cabinet. Fit a pull-out shelf or a simple wooden tray that slides. The brewer sits on the tray, the beans and cups sit beside it, and the whole unit slides forward to the counter edge for brewing. Pod brewers and small drip makers handle this fine. Espresso machines generally do not, because of the water tank lift.
Never run a brewer inside a closed cabinet. Steam and heat have nowhere to go, the shelf above absorbs moisture, and manufacturer instructions almost universally require open clearance. Slide it out, brew, slide it back once cool.
This approach is the strongest answer for renters and for anyone whose kitchen doubles as a dining room. It also solves visual clutter completely, since the station disappears when a door closes.
Homestyler's small kitchen coffee bar guidance makes a similar point about reclaiming unused cabinet volume rather than fighting for counter inches .
6. The Rolling Cart in the Fridge Gap
Measure the gap beside your refrigerator. In a lot of US apartments it runs 10 to 16 inches, filled with a broom or nothing.
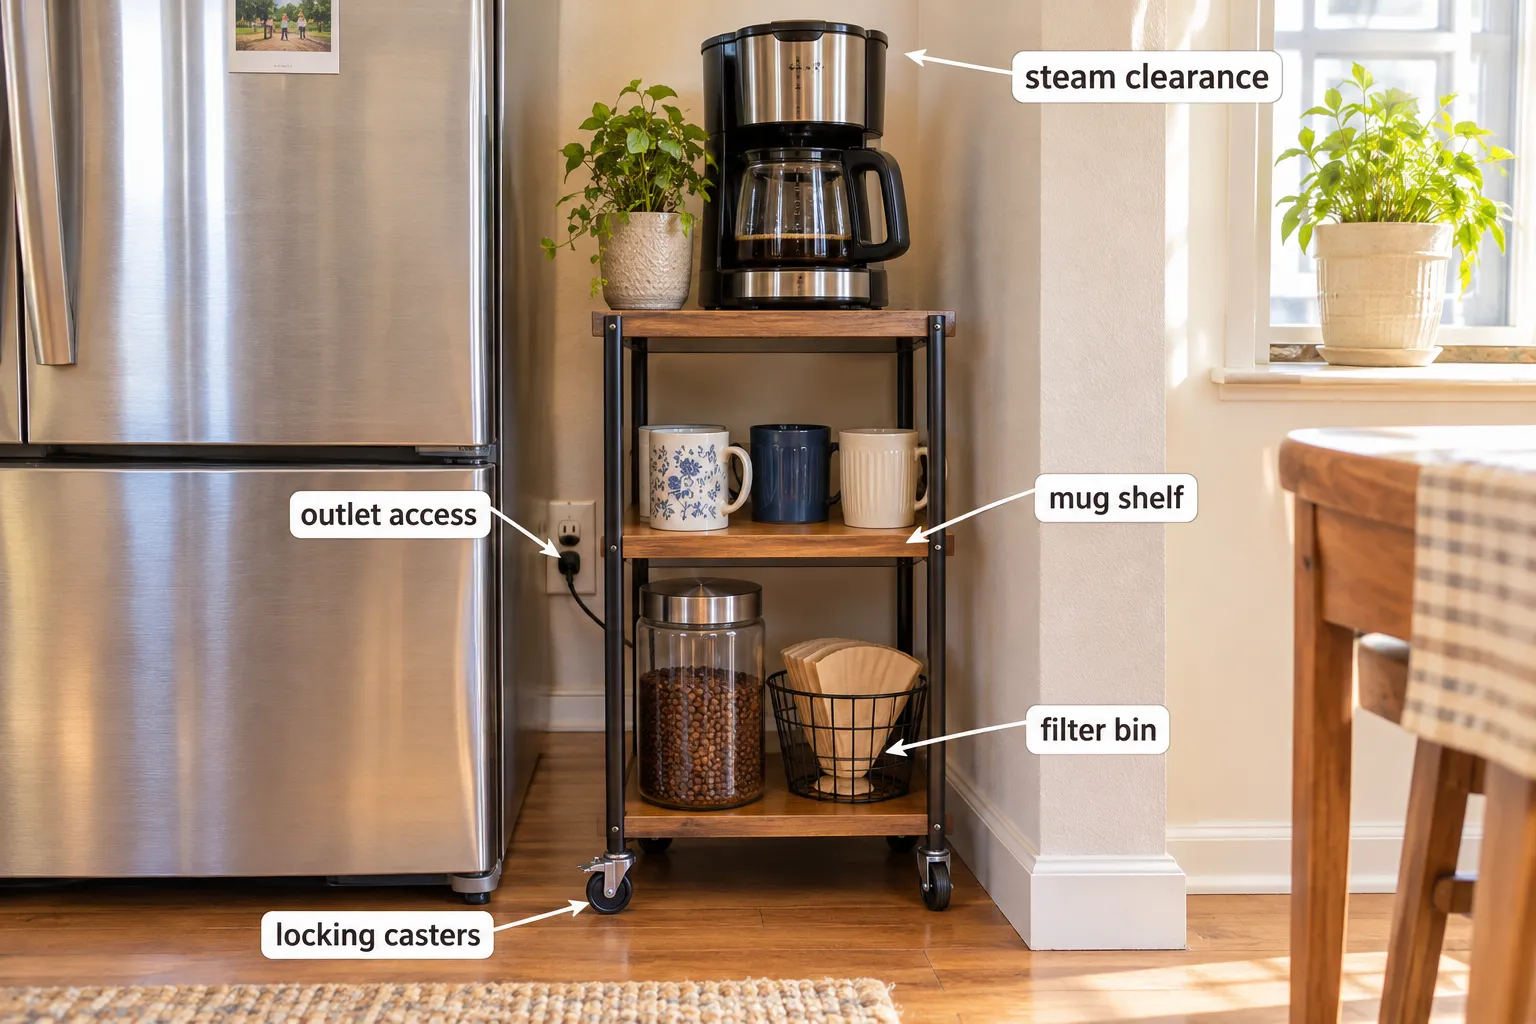
A slim rolling cart turns that into a complete kitchen coffee station. Top shelf: the brewer. Middle: mugs and a sugar jar. Bottom: beans, filters, and a small bin. Lock the casters so it does not drift when you press the brew button.
Two practical checks. First, the cart needs to reach an outlet, and running a cord across a walkway is a trip hazard and a code concern in rentals. Park the cart where the cord reaches directly or keep the brewing position next to the counter outlet and roll it back afterward. Second, do not brew with the cart pushed into the gap if there is a cabinet overhead. Roll out, brew, roll back.
The rolling cart is also the best coffee nook for shared apartments, because it can physically move out of someone else's way during dinner prep.
7. The Floating Shelf Stack Above a 12-Inch Counter
When horizontal space runs out, go up. Two floating shelves above a narrow counter strip hold cups, bean jars, and syrups while the machine keeps the counter to itself.
Mount the lower shelf at least 20 inches above the counter if a drip or pod brewer sits underneath, more if the machine's lid opens upward. Steam rises, so the underside of that lower shelf should be sealed wood, tile, or metal rather than raw particleboard.
Keep the shelf contents to one layer deep. The second row of anything on a shelf becomes archaeology.
Renters without drilling permission can get most of this with a freestanding two-tier riser on the counter instead. It costs less, it moves, and a wooden coffee bar organizer in this format ran $19.99 on Amazon as of November 5, 2026.
Good Housekeeping's home coffee bar roundup leans heavily on vertical storage for exactly this reason: shelves give a small coffee corner the look of a dedicated bar without taking working surface away .
8. The Tray Station: The 15-Minute, Under-$20 Build
The cheapest way to set up a coffee station is a tray. That is not a compromise, it is a design decision with a real benefit: the entire station lifts off the counter in one motion when you need the space.
Put the brewer or a pour over setup on a 12 by 18 inch tray with a lip. Add a sealed bean jar, a small spoon, and two cups. Nothing else. The lip catches drips and grounds, which is the part that keeps the actual counter clean.
A Mind Reader condiment station, the kind with compartments for sugar, stirrers, and pods, was $15.39 on Amazon as of November 5, 2026, and works as a tray station's organizing core for anyone who takes milk and sugar.
This is also the best dorm answer. A dorm coffee station is a tray, a sub-five-inch brewer, a lidded pod box, and two mugs, sitting on a desk or a dresser. Check your school's appliance rules before buying anything with a heating element, and never run a brewer on carpet or under a loft bed frame.
9. The Under-Cabinet Strip for Deep but Narrow Counters
Some small kitchens have depth but no width, typically a galley with 25-inch counters and only 15 free inches of run.
Build front to back instead of side to side. Bean jar and grinder at the back against the backsplash, brewer at the front where you work. Cups hang from under-cabinet hooks directly above the brewing position so you reach up, not sideways.
Under-cabinet hooks are the highest-return small addition for narrow kitchens, since mugs stop using counter area entirely. Space them so handles do not clink, and keep them out of the steam column from the brewer.
Front-to-back layouts do break the clean left-to-right workflow, so accept one compromise: grinding happens at the back, brewing at the front, and you turn once in between. One turn is fine. Three is a bad layout.
10. The Breakfast Nook Sideboard, 30 Inches Away From the Kitchen
Nothing requires a coffee station to be in the kitchen. If the kitchen counter is full and there is a sideboard, console table, or bookshelf top in the next room, move the station there.
This frees the kitchen entirely during cooking and creates a genuine coffee nook, which is nicer to stand at than a crowded counter beside a sink full of dishes. The English Home's coffee bar features lean on exactly this idea of treating the setup as furniture rather than appliance storage .
Three practical requirements. You need an outlet on that wall with capacity to spare, since a drip brewer or espresso machine draws roughly 1,000 to 1,500 watts and should not share a circuit with a space heater or microwave. You need a water plan, usually a filled glass carafe refilled once a day. And you need a hard, sealed surface, because a wood sideboard will mark where water sits.
A tray on top of the furniture solves the third problem for about fifteen dollars.
11. The Coffee Bar Cabinet With a Pull-Out Shelf
For small kitchens with an unused upper cabinet, a coffee bar cabinet is the tidiest permanent solution. Clear one cabinet entirely, fit a pull-out or slide-out shelf, and put the brewer on it.
Pull the shelf out to brew so steam vents into open air. Push it back when the machine cools. Everything the station needs, beans, filters, cups, sweeteners, lives in the same cabinet at eye or hand level.
The honest limitation: pull-out shelves have weight ratings, usually 25 to 50 pounds for consumer slides. A heavy espresso machine with a full water tank can approach that. Check the rating before mounting one, and skip this layout for prosumer machines.
Renters can approximate it with a sturdy freestanding shelf inside the cabinet and a plain wooden board that slides out onto the counter edge. No hardware, no holes, no deposit argument.
12. The Portable Station for Kitchens With No Fixed Spot
The last layout is for people whose kitchen cannot give up a single permanent inch, or who move frequently.
Everything fits in one lidded bin or a canvas caddy: a manual brewer, a hand grinder, a kettle, beans, and filters. It lives in a cabinet and comes out onto any flat surface. Manual methods make this work, since an Aeropress or pour over setup has no cord and no fixed footprint.
Battery-powered machines are starting to serve this layout too. TechRadar describes Dreame's Ecceluxe Go, expected in Spain and Portugal by the end of 2026, as a battery-powered compact espresso machine that can heat cold water and brew from pods or grounds . It is designed around portability rather than permanent installation, which makes it more interesting for a flexible station than for a built-in bar. Availability outside those markets is not confirmed, so treat it as a category to watch.
The portable station also doubles as a travel kit, which is more than any built-in bar will do for you.
Comparing the 12 Layouts by Counter Width and Machine Type
| Layout | Counter width | Machine type | Best for |
|---|---|---|---|
| Pod strip | 6 to 12 in | Single-serve pod | Dorms, one-cup mornings |
| Drip corner | 18 to 24 in | Drip brewer | Two-person households |
| Espresso line | 24 to 30 in | Espresso plus grinder | Milk drink makers |
| All-in-one | 14 to 18 in | Bean-to-cup | One-touch drinkers |
| Cabinet interior | 0 in permanent | Pod or small drip | Renters, tiny kitchens |
| Rolling cart | 10 to 16 in gap | Pod or drip | Shared apartments |
| Tray station | 12 to 18 in | Any compact brewer | Budget builds |
| Portable kit | Temporary only | Manual or battery | Frequent movers |
Floating shelves, under-cabinet strips, sideboard nooks, and coffee bar cabinets are variations layered on top of these eight footprints, which is why they sit outside the table rather than inside it.
What to Watch Out For
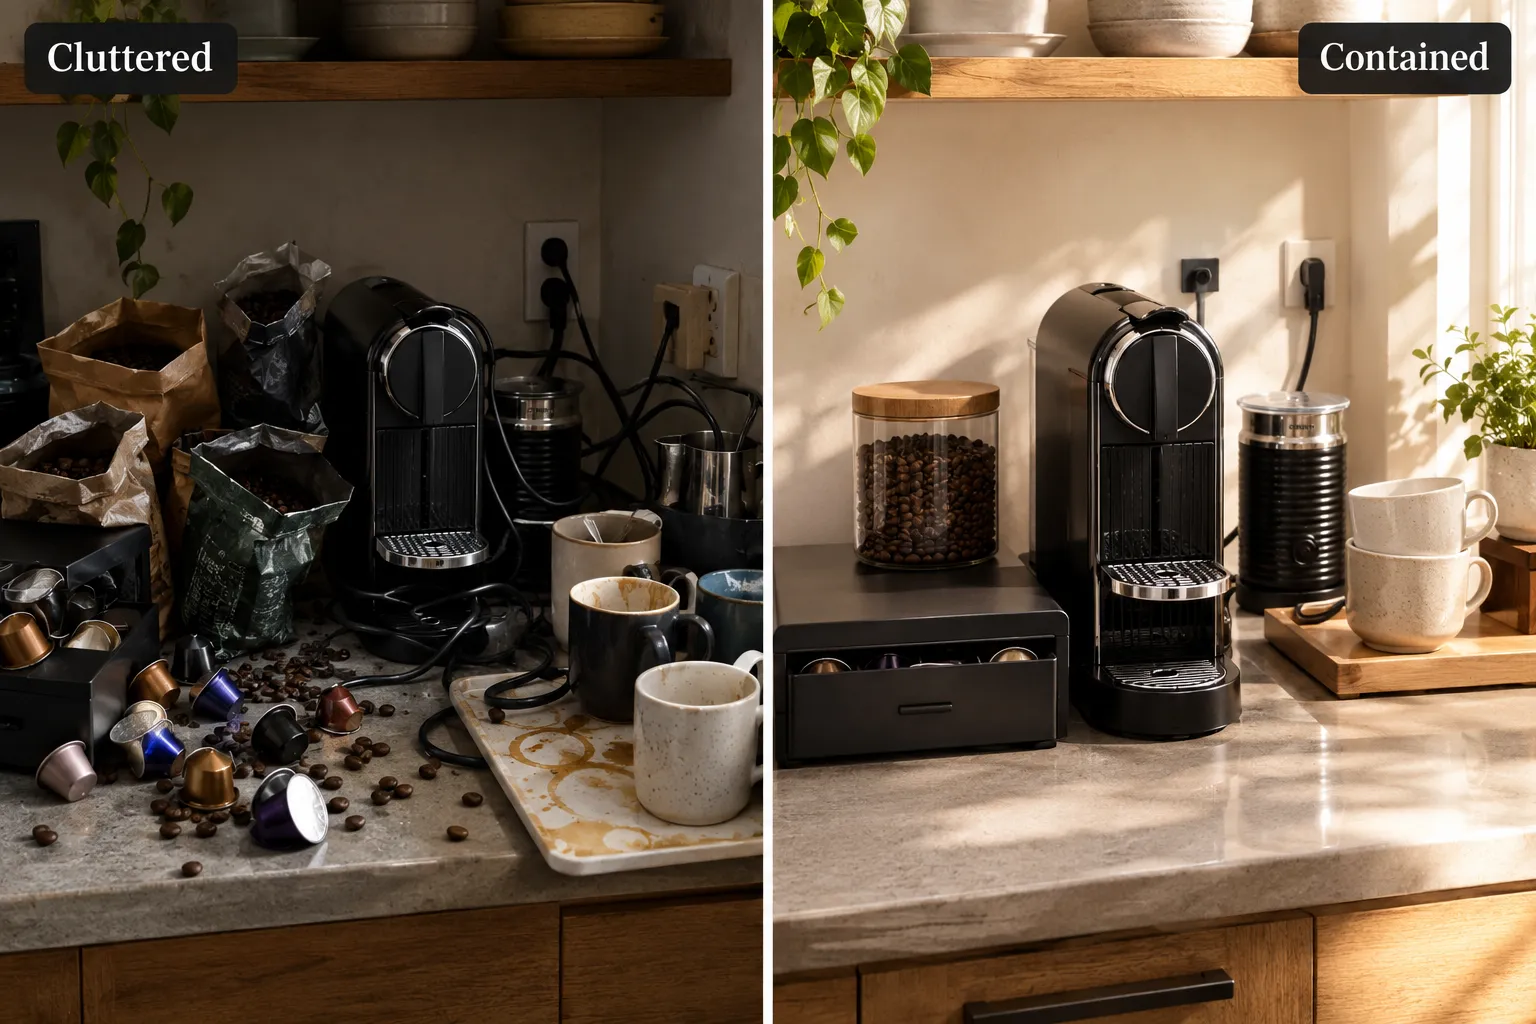
Three failure modes account for most abandoned coffee stations, and none of them are about taste.
Clutter traps. Open bags of beans, loose pods, and spare lids are the usual culprits. One lidded jar for beans protects flavor and hides the packaging at the same time, since oxygen exposure after the roast date is what flattens aroma fastest. One closed container for pods. One tray for everything that is not the machine. If an item has no container and no job, it goes in a cabinet.
Limit the station to two drink styles. The moment you add matcha, protein powder, and three syrups, a coffee corner becomes a counter pile. Keep a short list of milk-based drinks you actually make and stock only for those.
Outlet placement. Count the plugs before you choose the spot. An espresso machine and a grinder together can pull well over 1,500 watts, and a standard 15-amp US kitchen circuit supplies about 1,800. Running both simultaneously on the same circuit as a toaster trips breakers. Plug the machine directly into the wall rather than a thin extension cord, and keep any power strip off the counter and away from water.
Steam under cabinets. This is the most commonly ignored one. Drip brewers and espresso machines vent hot moist air upward during and after brewing. Repeated exposure swells cabinet bottoms and lifts veneer. Leave vertical clearance per the manufacturer's instructions, pull machines forward when brewing, and prefer a spot with open air or a sealed surface above.
A fourth, smaller point: water. Hard water builds scale inside any machine with a boiler, and scale changes heating performance before it causes an outright failure. Set a recurring reminder and follow a real descaling routine rather than waiting for a warning light.
Coffee Station vs Full Coffee Bar in a Small Kitchen
A station is functional. A bar is furniture. In a kitchen under about 100 square feet, the station wins almost every time, because a bar commits permanent floor or wall area to something used for six minutes a day.
The exception is a household where two or three people make drinks in the same twenty-minute window. Then the bar's extra surface earns its space by letting one person grind while another froths.
Specialty drinks keep pushing people toward the bar end of the scale. The NCA reported that 47% of American adults had specialty coffee in the past day in its June 2026 specialty report, compared with 42% for traditional coffee . More milk, more syrups, more tools. Build for the drinks you make most weeks, not the ones you make on Sunday.
As an Amazon Associate, Coffee Rank IQ earns from qualifying purchases.
FAQ

Conclusion
Match the layout to the kitchen you have. Under 15 inches of free counter: the pod strip, the tray station, or the cabinet interior. Fifteen to 24 inches: the drip corner or a rolling cart in the fridge gap. Twenty-four inches and up: the espresso and grinder line, run beans to grind to brew to milk to cups in one direction.
Next step before you buy anything: take a tape measure to the intended spot and write down three numbers, the free width, the usable depth, and the vertical clearance to whatever is above. Those three numbers eliminate most of the wrong machines in about ninety seconds, which is less time than it takes to brew.